Check the power and the start controls first
- Check the power connection and your model's start controls before you touch the belt or buy parts.
- Some players need a specific action: START/STOP on the AT-LP120XUSB, 33 or 45 selected on a Fluance, PHONO mode and tonearm movement on the Electrohome RR75.
- On a belt-drive AT-LP60X, make sure the belt is on the brass-colored motor pulley. The direct-drive AT-LP120XUSB has no belt.
- Stop for a damaged cord, heat, smoke, a burning smell, liquid or scraping, and contact the manufacturer or a turntable repair technician.
A record player can have its lights on and still be waiting for you to press the right control. We'd check the power and the start controls before you lift the platter off or order a belt, because those checks tell a player that's waiting for a command apart from one with a drive problem.
If the platter already turns but there's no music, skip ahead to the audio checks.
Find your full model number next, because the fix depends on how the platter is driven. The AT-LP60X has a belt you can reach, the direct-drive AT-LP120XUSB has none, and the Electrohome RR75 also needs PHONO mode and tonearm movement. The sections below cover those three, plus a Fluance check for the RT82, RT83, RT84 and RT85.
With the power disconnected, look over the cord and the connections you can reach. Plug back in only if they're undamaged and the outlet is safe to use.
On both Audio-Technica models, check that the supplied AC adapter is connected to the player and the outlet, and on the AT-LP120XUSB that the adapter's detachable plug is properly attached. Finish assembly before you connect power. If the adapter is missing or you're unsure it's the right one, ask the manufacturer for the approved replacement for your full model.
When it stopped matters too. Never worked after assembly or a move? Retrace the model's setup before blaming a part. Used to work? Recheck power and startup, then the drive checks you can reach.
Stops at the end of a record? That may be the model's normal automatic stop. Scrapes, binds or keeps stalling? Stop trying and get help for your specific model.
The AT-LP120XUSB lights up but the platter stays still
On the AT-LP120XUSB, turning the power dial ON only lights the speed selector and strobe illuminator. The motor starts when you press START/STOP. The platter mounts directly on the motor shaft, so there's no belt to replace on this model.
Finish assembly and tonearm setup first, then use the AT-LP120XUSB start controls (opens in a new tab). Remove the cartridge protector and release the tonearm clamp if it's latched, leaving the tonearm at rest while you check rotation. Turn the power dial ON, put the record on the platter and select its speed.
Turn down the amplifier or speaker volume, then press START/STOP. The platter should start turning, and you don't need to lower the stylus to see whether it does.
Blinking speed buttons can mean standby, which this model enters after more than 30 minutes without use. Press START/STOP, or turn the power dial OFF and back ON, to wake it. If the platter still won't turn after the power and control checks, contact Audio-Technica support rather than removing drive parts.
Your AT-LP60X never worked after setup
The AT-LP60X arrives with its belt on the platter, but assembly still includes fitting that belt onto the brass-colored motor pulley. Here's the AT-LP60X setup sequence (opens in a new tab):
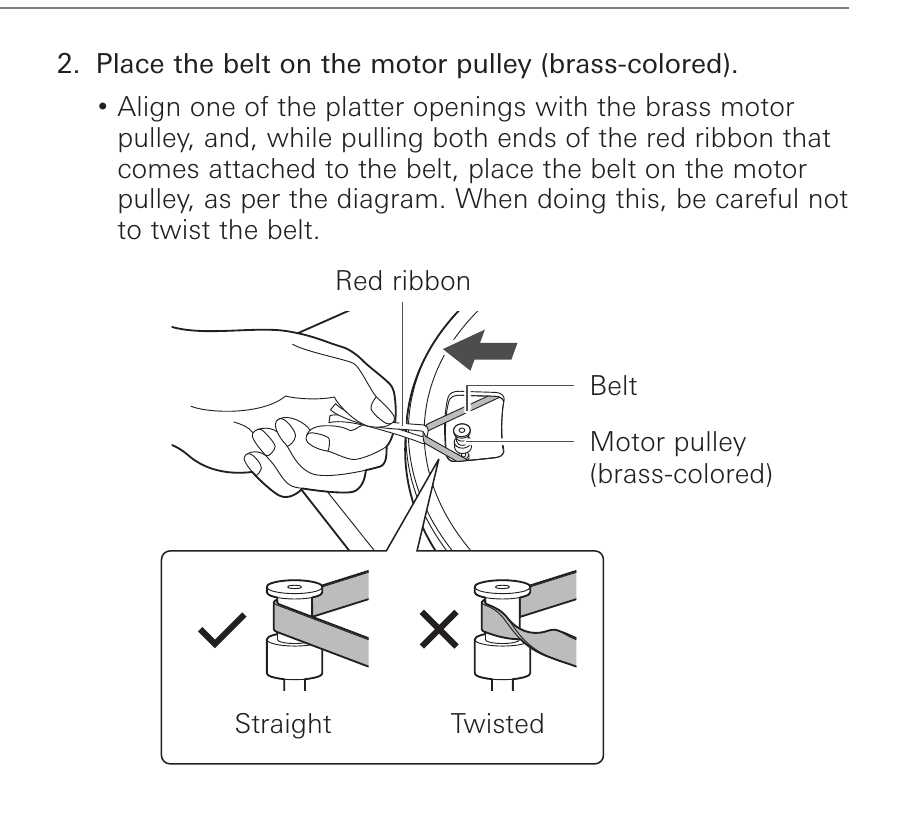
- Disconnect the AC adapter, keep the cartridge protector on and the tonearm at its rest while you work, and take off the felt mat if it's already on.
- Seat the platter fully on the spindle, with one of its openings lined up with the brass-colored motor pulley.
- If the red ribbon is still attached, pull both ends to guide the belt onto the pulley without twisting it, then remove the ribbon and put the felt mat on. No ribbon, and the belt needs refitting? Use the belt steps further down.
- Remove the tie holding the tonearm and press the tonearm lift button to raise it. Slowly turn the platter by hand ten times in the direction it normally turns (clockwise from above), lightly holding the arm if it moves and keeping the adapter disconnected.
- Make the audio connections with the PHONO/LINE switch set for your input, then connect the AC adapter with the cartridge protector still on. If the platter starts turning, press STOP without touching the tonearm and let the arm return to its original position.
Those ten turns reset the automatic mechanism, work out any twists in the belt and make sure it rides smoothly along the drive rim under the platter. The AT-LP60X has no separate power switch.
Starting the AT-LP60X once it's assembled
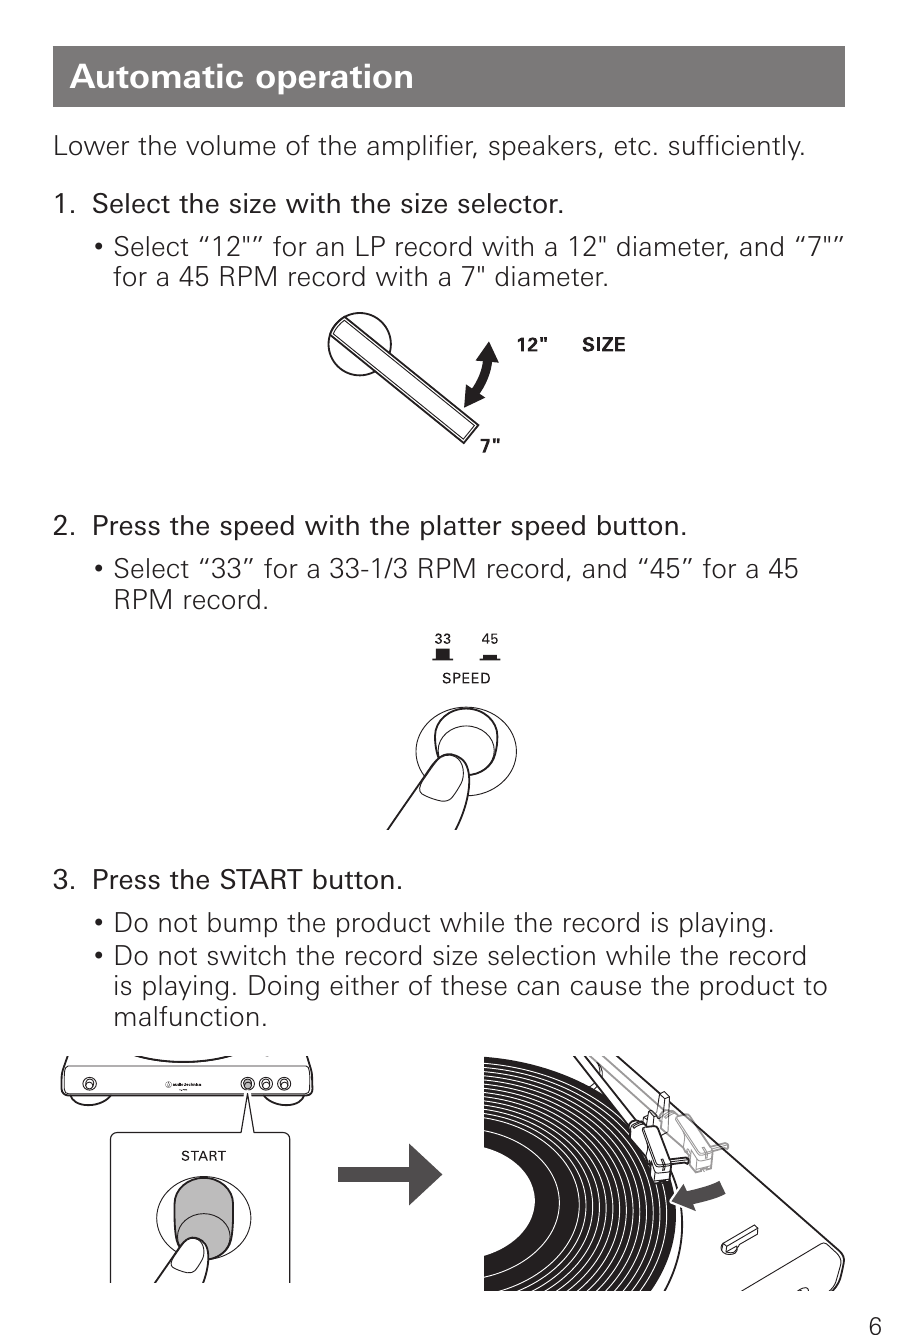
Pull the cartridge protector straight forward, without pressing down on it. Put a record on the felt mat, with the 45 RPM adapter if the record has a large center hole.
Turn down the amplifier or speaker volume, select the record's size (12 or 7 inches) and speed (33 or 45), then press START. The platter should turn and the tonearm should move by itself. Don't bump the player or change the size setting while it plays, because either can make it malfunction.
To stop, turn the volume down and press STOP. Let the tonearm return on its own, since interfering with it can also cause a malfunction, and take the record off only once the platter has stopped.
If it starts normally, you're done with the drive checks. If it stays still, check the belt below. When a record ends, the tonearm returning and the platter stopping on their own is normal for this model.
An AT-LP60X that used to work has stopped
A belt that has slipped off the platter or missed the motor pulley can leave the AT-LP60X standing still, and a stretched belt can make it turn slowly or unevenly. We'd check where the belt sits and what shape it's in before buying one, because a belt that has only slipped off goes back on along the same path.
Replace a damaged belt with one made for the AT-LP60X, following the AT-LP60X belt replacement steps (opens in a new tab), which also work for reseating a good one.
- Disconnect the AC adapter from the outlet. Put the cartridge protector on and keep the tonearm at its rest while you handle the platter.
- Take off the felt mat, put your thumbs through the platter openings and lift the platter off the spindle. Turn it over and remove the old belt if you're replacing it.
- Fit the belt around the platter's inner circle without twisting it. If you're reseating the old belt, check that it follows that same path.
- Refit the platter with an opening lined up with the brass-colored motor pulley. Reach through the opening, grasp the belt and pull it onto the pulley.
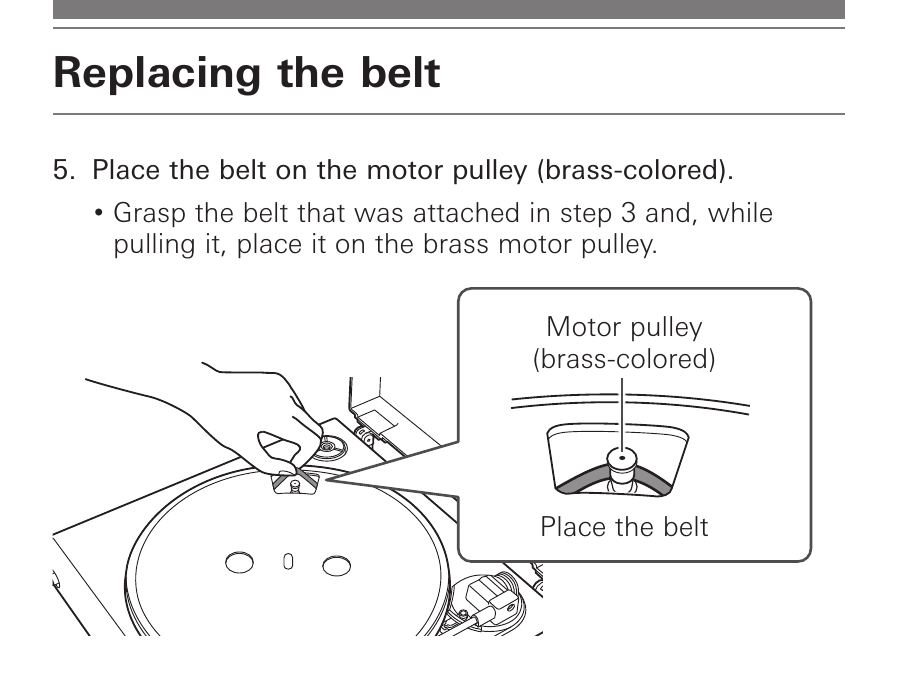
Then release any tonearm tie, raise the arm with the lift button and, with the power still disconnected, slowly turn the platter clockwise ten times, viewed from above. Put the felt mat back, connect power with the cartridge protector on, and start it as above.
Stop if the platter binds or scrapes. If a correctly placed belt and a proper start still don't get it turning, contact Audio-Technica support and tell them which checks you did.
On a Fluance, check the speed, Auto-Stop and motor cap
Fluance's platter troubleshooting (opens in a new tab) includes two control checks, and they're worth doing before you touch the belt. Selecting 33 or 45 is what engages the motor, and with Auto-Stop turned on, the platter also stays still until the tonearm is moved over it with a speed selected. Use your model's cueing steps to move the arm safely.
Still not turning? Use your model's manual to check the belt placement and look for wear, dust or debris. If you're unsure about the power adapter or the belt, ask Fluance for the approved one for your full model.
The RT82, RT83, RT84 and RT85 have one extra check for scraping. A motor cap that isn't seated correctly can rub against the motor pulley and stop it turning, so disconnect the power and check how the cap sits. The notch in the cap has to line up with the arrow in the motor cut-out, and the cap may need pushing into place.
If the cap won't seat normally or the scraping continues, stop and contact Fluance. The cap check applies to those four models only.
Electrohome RR75 needs PHONO mode and tonearm movement
The RR75 has two power controls and a transit screw, so work through all of them before you suspect the drive:
- Before you connect power, set the system on a sturdy, level surface. Open the lid and turn the RR75's transit screw clockwise until it's fully lowered for playback. That's an RR75 instruction, so don't turn screws on another player unless its own manual tells you to.
- Plug the power cable into the rear power input and a known working outlet. Set the rear power switch to ON, then press the front POWER knob or the remote's POWER button.
- Press the SOURCE knob or the remote's SOURCE button until PHONO appears on the display.
- Lift the lid and lock its hinge open. Check that the transit screw is fully lowered, put a record on the platter and select the matching speed.
- Remove the stylus protector, unlock the tonearm and raise the cueing lever. Moving the tonearm over the record should start the platter. Lower the cueing lever to begin playback.
The RR75 stops the platter at the end of a record but doesn't return the tonearm, so put the arm back on its rest and lock it after playing. If it stops too early, try a few other records, because auto-stop can behave differently with some records. If it still won't start after these checks, contact Electrohome support.
It spins but there's no sound
Once the platter turns, check which input is selected on your amplifier or powered speakers, and set the turntable's output to match that input.
On the AT-LP120XUSB and AT-LP60X, use PHONO for a phono input and LINE for AUX or another line input. PHONO into an AUX or line input can sound very quiet or silent, while LINE into a phono input can come out far too loud or distorted.
Also make sure the cartridge protector is off and the tonearm is lowered for playback. If the settings are right and it's still silent, move on to the model's cartridge and stylus troubleshooting.
The RR75 is wired differently. Headphones in its front jack switch off the built-in speakers. For an external system, connect its rear RCA output to an ordinary audio input on the amplifier, never PHONO, and follow the RR75 connection guide (opens in a new tab) by setting the RR75's volume to 0 and adjusting the volume on the external system instead.
When it still won't turn
If the platter still won't turn after the power, start and assembly checks you can do from the outside, contact the manufacturer or a turntable repair technician. A hum, a click or a lit control won't pinpoint the failed part, so get it diagnosed before you buy a motor. Leave the cabinet and any internal electrical work to qualified service people.
Give them the full model number, which power supply is connected, and whether the problem began at setup, after a move or during normal use. Tell them which controls you used, which manual steps you completed and what happened: no movement, a brief turn, scraping, or normal turning with no sound.
Ask for approved replacement parts and a repair quote that covers the diagnostic charge, the terms if you decline the estimate, and any shipping costs. Before you ship it, ask for packing directions for your exact model and which removable parts should go with it.
More in this category
Keep following the signal
Elsewhere on the desk