Choose the result you want from the room
- For a coverage layout, start with your room size, listeners' ear height and speaker choice. Yamaha CISSCA estimates the speaker count and effective sound pressure level.
- Choose your layout around the result you need: coverage without gaps, high sound levels or fewer speakers.
If you're filling a listening area with sound, the smallest speaker count can come with uneven levels across the room. We'd begin with Minimum Overlap when consistent coverage is your priority, because Yamaha recommends it to eliminate coverage gaps.
The worked example here is Yamaha's Commercial Installation Solutions Speaker Calculator, or CISSCA. You supply the room size, speaker type and layout, and the software calculates a speaker-count estimate plus the system's effective sound pressure level, abbreviated SPL.
Yamaha describes CISSCA (opens in a new tab) as a fast, easy way to estimate speaker quantities, with easy setup and operation. Its useful end result is a proposed system you can review, adjust and document.
Check your speaker before choosing a mode
Check your exact model against Yamaha's supported speakers for CISSCA V3.1 (opens in a new tab) before building the layout. The list covers three groups, and an asterisk below means Yamaha says that model isn't available in some regions.
- Ceiling speakers: VXC4, VXC6, VXC8, VXC2F, VXC3F, VXC5F, S5*, NS-IC400*, NS-IC600*, NS-IC800*, VC4*, VC6*, VC8*, VC4N, VC6N and VC8N.
- Surface-mount speakers: VXS5, VXS8, VXS3F, VXS3FT, VXS1ML, VS4, VS6, S15*, S55*, NS-AW392*, NS-AW592* and NS-AW992*.
- Subwoofers: VXS10S, VXS10ST, VXS3S and VXC8S.
The two modes give you different levels of control. AUTO offers a shorter sequence for its supported ceiling speaker, while ADVANCED provides more flexible, detailed settings and supports various ceiling speakers, surface-mount speakers and subwoofers.
Your listeners' height changes the coverage reference
Have your room size and listeners' ear height ready before opening the room-information screen. Ear height defines the listening plane, the average height of listeners' ears, where consistent SPL is the design goal.
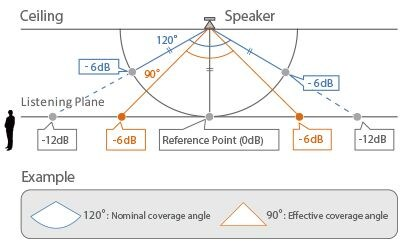
For ceiling speakers, distinguish the coverage angle in the speaker specification from the effective angle used by the calculator. The nominal angle describes the point where SPL is 6 dB below the on-axis level when measured at a constant distance from the speaker.
The effective angle instead describes the point where SPL is 6 dB below the on-axis level at the listening plane. That's the relevant distinction when you're looking at how sound reaches people across the room.
Yamaha says the effective angle is usually about 70–80% of the nominal angle, and CISSCA uses effective coverage angles (opens in a new tab). Keep that distinction in mind when comparing a speaker's published coverage specification with the calculated layout.
What the five ceiling layouts trade off
Choose a ceiling pattern by balancing level consistency against speaker quantity. The names describe different relationships between neighboring speakers, so use the definitions below when making that choice.
| Layout | What you're choosing |
|---|---|
| Maximum Overlap | Aligns one speaker's -6 dB SPL point with the adjacent speaker's axis. Requires more speakers. Yamaha describes it as giving optimum overall performance where high SPL matters. |
| Minimum Overlap | Yamaha's recommended approach for effectively eliminating coverage gaps. |
| Edge-to-Edge | Aligns the -6 dB points of adjacent speakers. A commonly used configuration that Yamaha says suits all its ceiling speakers supported by CISSCA. |
| 1.4 x Edge-to-Edge | Uses 1.4 times the standard Edge-to-Edge spacing, allowing fewer speakers and a more economical system. |
| 2.0 x Edge-to-Edge | Uses twice the standard Edge-to-Edge spacing. The most economical approach, but it can produce uneven SPL throughout the listening area. |
The multipliers refer to standard Edge-to-Edge spacing. They're useful when comparing the wider layouts, while the overlap definitions (opens in a new tab) explain how each speaker's coverage relates to its neighbor.
Worked example with the VXC4 in AUTO
For a VXC4 ceiling-speaker project, AUTO mode (opens in a new tab) calculates the quantity through five stages. Only the VXC4 is available in this mode, so use that model boundary when choosing this route.
- Enter the room size and the height of your listeners' ears in Room information. Check those entries before selecting the layout.
- Select the VXC4 ceiling-speaker layout type. Your selected pattern sets the layout choice for this estimate.
- Choose BGM or Speech as the application type. Enter the target SPL at this stage too, so the final comparison has your intended level to work against.
- Check your settings and the estimated number of speakers. Move or remove individual speakers if needed, then review their positions in the layout.
- Compare the estimated system's effective SPL with the target entered in the application stage. Click REPORT to output the results in report form.
Use ADVANCED for more speaker choices and control
Choose ADVANCED mode (opens in a new tab) when you need its broader speaker-type choices or more detailed settings. Here, selecting the speakers is a separate stage before you set the application and target level, and layout selection comes afterward.
- Enter the room size and listeners' ear height. Check the room information you've entered.
- Select the speaker types you intend to use. Confirm your speaker selection before setting the application.
- Specify the application type and your project's target SPL. Check that the target shown matches the level you intend to compare against.
- Specify the speaker layouts. Review the layout choice before checking the quantity estimate.
- Check your settings and the estimated number of speakers required. Move or remove individual speakers as needed, then review the adjusted positions.
- Check the difference between the estimated system's effective SPL and your target SPL from the application stage. Click REPORT to produce the results in report form.
Both modes also support importing a blueprint or another image as needed. That optional capability sits alongside the initial room-information stage.
Aim surface-mount speakers toward the farthest listener
For a surface-mount layout, aim the speaker's axis at the head of the most distant listener. Yamaha's surface-mount alignment guidance (opens in a new tab) uses the last row as the aiming reference to help distribute SPL evenly across the listening plane.
The reason is the balance between distance and angle. Listeners in the last row receive less level because they're farther away, while closer listeners receive less level because they're off-axis. Those two effects tend to even out the distribution.
Use CISSCA's fine adjustment of surface-mount speaker tilt angle to refine that alignment in your design. Tilt gives you another placement control alongside the individual speaker positions.
Read the count and SPL as different results
The speaker-count estimate answers how many speakers the proposed system calls for. The effective SPL map gives you a view of the calculated level across the layout, where the design goal is consistency at listeners' ear height.
Keep two questions separate when reviewing the result: does the estimated level match your target, and does the chosen pattern provide the coverage distribution you want? A wider, economical layout carries a different distribution trade-off from a layout chosen to close coverage gaps.
Use the generated report as documentation for your system proposal. Yamaha provides report output (opens in a new tab) for that purpose, giving you a way to carry the calculated results into the proposal.
More in this category